In this tutorial, we’ll explore how to implement active and inactive status functionality using PHP. This feature allows you to control the status of items, such as products, in a dynamic and user-friendly manner. By toggling between active and inactive states, you can easily manage and display information to users on your website. Let’s dive into the step-by-step process of creating this functionality.
Step 1: Create a Database and Table
Create a New Database (Database name is “admin-status“).
You’ve already provided the SQL command to create the necessary table in your initial question:
CREATE TABLE Products (
    id INT PRIMARY KEY AUTO_INCREMENT,
    name VARCHAR(255) NOT NULL,
    timestamp timestamp NOT NULL DEFAULT current_timestamp() ON UPDATE current_timestamp(),
    status TINYINT NOT NULL DEFAULT 0
);
This code creates a table named “Products” with columns: “id” as the primary key, “name” for the product name, “timestamp” to track the creation and update times, and “status” to hold the active/inactive status.
Step 2: index.php
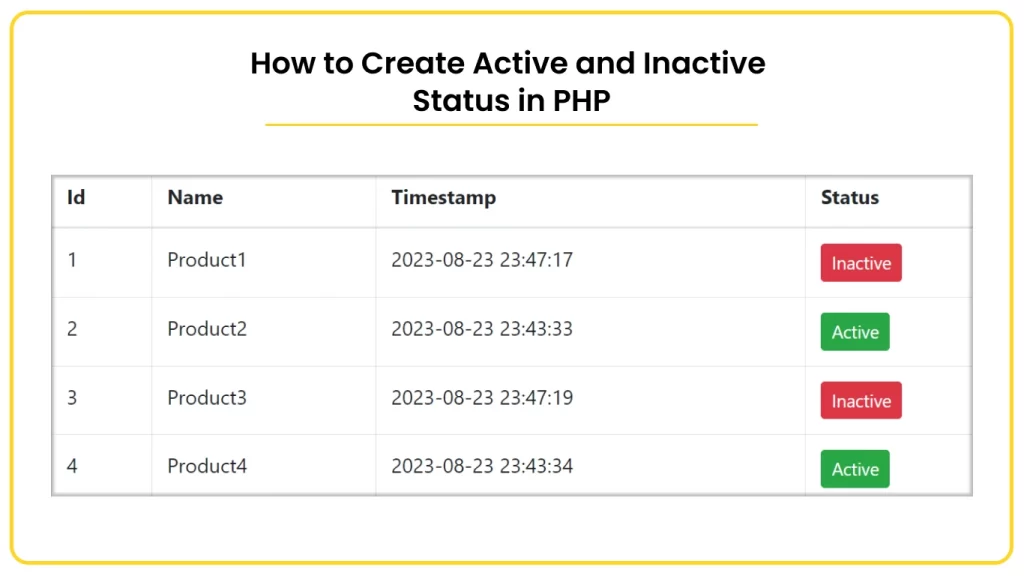
This file is responsible for displaying the list of products along with their active/inactive status buttons.
<!DOCTYPE html>
<html lang="en">
<head>
    <meta charset="UTF-8">
    <meta http-equiv="X-UA-Compatible" content="IE=edge">
    <meta name="viewport" content="width=device-width, initial-scale=1.0">
    <title>index</title>
    <link rel="stylesheet" href="https://cdn.jsdelivr.net/npm/bootstrap@4.0.0/dist/css/bootstrap.min.css" integrity="sha384-Gn5384xqQ1aoWXA+058RXPxPg6fy4IWvTNh0E263XmFcJlSAwiGgFAW/dAiS6JXm" crossorigin="anonymous">
</head>

<style>

</style>
<body>
<?php
include_once 'config.php';
?>
<table class="table table-bordered mt-5">
<thead>
<tr>
 <th>Id</th>
<th>Name</th>
<th>Timestamp</th>
<th>Status</th>
</tr>
</thead>

<tbody>
<?php
$sql = "SELECT * FROM products";
$result = mysqli_query($conn, $sql);

$i = 1;
if ($result->num_rows > 0) {
    while ($row = $result->fetch_assoc()) {
        ?>
        <tr>
            <td><?php echo $i; ?></td>
            <td><?php echo $row['name']; ?></td>
            <td><?php echo $row['timestamp']; ?></td>
            <td>
                <?php
                if ($row['status'] == 0) {
                    echo '<a class="btn btn-sm btn-success" href="status.php?id=' . $row['id'] . '&status=1">Active</a>';
                } else {
                    echo '<a class="btn btn-sm btn-danger" href="status.php?id=' . $row['id'] . '&status=0">Inactive</a>';
                }
                ?>
            </td>
        </tr>
        <?php
        $i++;
    }
} else {
    echo "<tr><td colspan='4'>No data found</td></tr>";
}
?>
</tbody>
</table>
<script src="https://code.jquery.com/jquery-3.2.1.slim.min.js" integrity="sha384-KJ3o2DKtIkvYIK3UENzmM7KCkRr/rE9/Qpg6aAZGJwFDMVNA/GpGFF93hXpG5KkN" crossorigin="anonymous"></script>
<script src="https://cdn.jsdelivr.net/npm/popper.js@1.12.9/dist/umd/popper.min.js" integrity="sha384-ApNbgh9B+Y1QKtv3Rn7W3mgPxhU9K/ScQsAP7hUibX39j7fakFPskvXusvfa0b4Q" crossorigin="anonymous"></script>
<script src="https://cdn.jsdelivr.net/npm/bootstrap@4.0.0/dist/js/bootstrap.min.js" integrity="sha384-JZR6Spejh4U02d8jOt6vLEHfe/JQGiRRSQQxSfFWpi1MquVdAyjUar5+76PVCmYl" crossorigin="anonymous"></script>
</body>
</html>
In this code:
- You include the “config.php” file to establish a database connection.
- A SQL query retrieves all rows from the “products” table.
- Inside a loop, each product’s information is displayed in a table row along with an active/inactive status button.
- Depending on the product’s status, the appropriate button with corresponding Bootstrap classes is displayed.
Step 3: status.php
This file handles the logic to update the status of a product.
<?php
include 'config.php';

$id = $_GET['id'];
$status = $_GET['status'];
$query = "UPDATE products SET status = $status WHERE id = $id";
$result = mysqli_query($conn, $query);

if ($result) {
    header('location:index.php');
} else {
    header('location:index.php');
}
?>
In this code:
- You include the “config.php” file to establish a database connection.
- The script retrieves the “id” and “status” parameters from the URL query string using $_GET.
- A SQL query is used to update the “status” column of the specified product in the “products” table.
- After the query execution, the user is redirected back to the “index.php” page.
Step 4: config.php
This file contains the code to establish a connection to the MySQL database.
<?php
$servername = "localhost";
$username = "root";
$password = "";
$db = "admin-status";

$conn = mysqli_connect($servername, $username, $password, $db);

if (!$conn) {
    die("Connection failed: " . mysqli_connect_error());
}
?>
In this code:
- You define the necessary variables for the database connection.
- The mysqli_connect function is used to create a connection.
- If the connection fails, an error message is displayed.
Make sure you have the “MySQL” extension enabled in your PHP configuration for this code to work.
Remember that this code provides a basic example of implementing active and inactive status using PHP and MySQL.